this is a blog about memory keeping, funny stories & baked goods i make, and do my best not to eat. proper capitalization is always optional.
Showing posts with label easter. Show all posts

5.16.2012

diy: glow in the dark easter egg hunt

so... i know easter is long gone until next year.
but i still wanted to share this incredibly fun idea we did this year.
& turned it into an outdoor party for 11 littles...

WHO HAD A BLAST!
and EVERYONE says they can't wait until next year.

(picture taken by my friend mindy)

we had a glow in the dark easter egg hunt.
it was SO much fun.
each parent chipped in eggs, glow sticks & candy for their kids
& we bought pizza to feed the littles while we stuffed eggs.

(picture taken by my friend mindy)

here's some advice we learned along the way:

-buy the BIG eggs, but don't buy them from the dollar store
(the small eggs won't hold everything without tape, and the dollar store brand won't stay shut)

-the best eggs were the BIG ones from big lots & walmart.

-to get your glow on, buy bulk packs of glow in the dark bracelets
(found at walmart, & the dollar store all for $1)

-SAVE the bracelet connectors!!!
(the kids are going to want to wear every glow thing they take out of the eggs)

-get small-ish candies, too big & you won't have room for the bracelet.

-make sure you turn off your sprinkler system
(because when you set the under 2 crowd out to hunt in the bushes close to the house, they are going to FREAK when they get sprayed by water in the dark!!)

in the end it took us longer to stuff the eggs than it took for the kids to find them.
but every single kid LOVED it.
from the youngest (which was rance) to the oldest (which was mason)
even the parents were excited with the glow in the dark eggs!
and...here in florida..
it's much more fun to run after your kid in the dark for chocolate hidden in glow in the dark eggs,
than in the 90 degree, full sun heat that leaves them boo-hooing when the crack open their egg to a mushy chocolate mess.
trust me.

the ONLY down side is it's a little difficult to get cute egg-hunting pictures.
sometimes you gotta settle for the memories
(and your friend's un-blurry pre-hunt pictures!)

we are most definitely having a second annual glow in the dark easter egg hunt next year.
the dude is already asking for it!

xo-k


4.12.2011

diy: personalized clay eggs

a few weeks ago i saw these totally amazing personalized clay eggs on etsy..
& fell in love.
only problem is.. i couldn't justify buying them.
so i decided to try and make my own.


i couldn't find a tutorial for how to specifically make the stamped eggs..
but i found some tutorials on making clay eggs & on stamping clay & worked from there.

here's what you need:


-polymer clay (i used the cheap michaels brand in light blue)
-aluminum foil
-alphabet stamps
-acrylic paint
-pin
-cardstock
-work surface
-paintbrush
-toothbrush


1. tear off a piece of aluminum foil & crumple it up into the shape of an egg. squish it really good so you get all the air pockets out. the egg needs to be slightly smaller than what you intend your finish project to be.


do this for as many eggs as you intend on making.


2. preheat oven according to your clay's directions. knead your clay approximately 2 minutes.


3. roll out your clay to about 1/4" inch thickness. if you don't have a rolling pin (because i don't) use a smooth sided glass or something similar. make sure you are working on a surface other than your furniture because the clay can discolor your furniture!


4. once your clay is rolled out, wrap it around your foil egg shape, making sure to keep it tight around the form to prevent pockets of air from forming.


5. pinch off the excess clay & begin working the clay to smooth it out & form it into an egg shape.


6. all of the tutorials i read recommended piercing the clay to allow any trapped air to escape, so that's what i did. i figured it'd be covered up by the speckles so i went for it. make sure you only poke around the sides & back of the egg, so you have a smooth surface to stamp on. you can go back & pierce more once you've stamped.


7. using your stamps press down firmly enough to make an impression in the clay, but not so much to change the shape of your egg. if the edges of your stamp make a mark you can smooth back over it with your finger.


8. once all your eggs are finished, accordian fold your piece of cardstock & place it inside a baking pan, putting the eggs in the folds. according to what i read this keeps the egg from getting a flat spot on the bottom as it bakes. bake your clay according to your package directions. mine stated to bake 15 minutes for each 1/4" inch thick. i baked for 20 just to be safe.


9. once your eggs have cooled it's time to speckle them! i mixed a little burnt umber acrylic paint with a smidge of white paint & a little water to thin it out. dip your toothbrush into the paint & holding it with the bristles away from you pull back on the bristles to flick the paint onto your egg.


10. using a small paint brush paint the indentions of your letters. you can put your eggs back into the oven for another 5 minutes to set the paint (i did.) or let them air dry for a few hours.

i cut up two different colors of cardstock into little strips, crumpled them up & put them in a bowl to complete my nest.

they are rustic & hand-hewn looking..
not nearly as perfect looking as the etsy ones..
but i LOVE them! :)

xo-k

linking to:
all thingz related
c.r.a.f.t
the diy showoff
ladybug blessings
my backyard eden
the thrifty home
someday crafts
tea rose home
savvy southern style
whipperberry
house of hepworths
my romantic home
tidy mom
fingerprints on the fridge
decor to adore
tatertots & jello

4.03.2011

diy: thumbprint bunny keepsake

in the spirit of my thumbprint heart keepsake this morning i decided to make this. 
it didn't turn out QUITE as perfect as the hearts.
(not that they were perfect either)
it's a little difficult to get a 7 month old to cooperate when ink & precise digit placement is involved.


but i'm embracing the imperfection of it & moving on.
it's going in the same frame as the thumbrint hearts went into,
& gracing the entrance of our home with a little festive easter spirit.

if you want to make one yourself all you need is:
-a piece of card stock the size & color you'd like
-ink in the color of your choice
-black pen
-willing fingers

ours were made by first pressing down the tip of the thumb for the body
& then just the tip of the pinkie for the ears.
draw on little eyes, a nose & some whiskers & you're done!

i'm thinking that i'd like to make season thumbprints for this frame from now on...
the hubs.. well, i'll have to work on him for the next one.. :)

xo-k

linking to:

3.31.2011

diy: bunny ears

are you ready for this?
can you handle the cuteness?

i dunno.... :)

i'll start you off slow..
don't want to overwhelm you with his cute little face & these awesome little ears all at once! :)

i wanted some kind of bunny ears for the babe for easter pictures..
but the ones i found were all too big.
so i decided to make my own.

you can make some too.. ya know ya wanna!

here's what you need:


-headband
-scrap white fabric (i used muslin)
-16 to 18 gauge wire (any color)
-hot glue gun
-wire cutters or heavy duty scissors


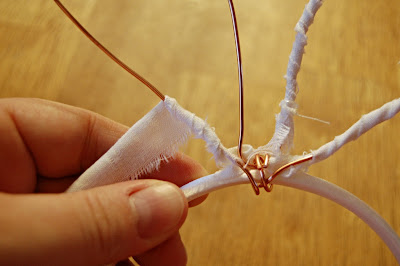
1. bend your wire to form bunny ears. leave extra wire on both sides of the ears to attach it to the headband.


2. wrap the extra wire around the headband, coming back through the middle of the two ears.
wrap each side around the bottom once, ending at the top & snipping off the extra.
(this is so there is nothing on the bottom poking your baby in the head :) 


3. tear strips about 1/2" wide down the length of your white fabric.
(i used 4 strips that were approximately 24" long)


4. on the top of your headband, put a small dab of hot glue, towards the backside.


5. take one of your fabric strips & stick the end of it on top of the hot glue.


6. starting with the outside part of one ear, wrap your strip around the wire, ending on the inside part of the ear. put a few small dots of hot glue as you wrap around to ensure that the strip doesn't come unwrapped. make sure you put a dab at the very top where the ear bends as well.


7. repeat above steps for remaining ear.


8. next, put a dab of hot glue on the underside of the headband where the wire sits. put the end of one strip on the bottom & wrap around to the back. make one complete loop around the wire to cover it, then continue out towards one end of the headband, passing through the middle of the ear as you pass by it.


9. continue wrapping around the headband, again adding dabs of hot glue to secure on the underside of the headband. snip off any extra fabric when you get to the end of the headband. repeat last steps to cover the other side of the headband.


& you are finished.
i covered my entire headband because i wanted all the fabric to match.
i left all the fraying pieces because i liked how it looked fuzzy like regular rabbit ears. :)
(if i had a little girl i would put a big bow right there in between the two ears.. )

(can i get a 'hooray' for the bumbo seat?! man i wish i had this thing with the dude!)

i dunno... maybe i'm partial..
but they are pretty dang cute..
then again maybe it's just the model :)

Related Posts Plugin for WordPress, Blogger...