are you ready for this?
can you handle the cuteness?
i dunno.... :)
i'll start you off slow..
don't want to overwhelm you with his cute little face & these awesome little ears all at once! :)
i wanted some kind of bunny ears for the babe for easter pictures..
but the ones i found were all too big.
so i decided to make my own.
you can make some too.. ya know ya wanna!
here's what you need:
-headband
-scrap white fabric (i used muslin)
-16 to 18 gauge wire (any color)
-hot glue gun
-wire cutters or heavy duty scissors
1. bend your wire to form bunny ears. leave extra wire on both sides of the ears to attach it to the headband.
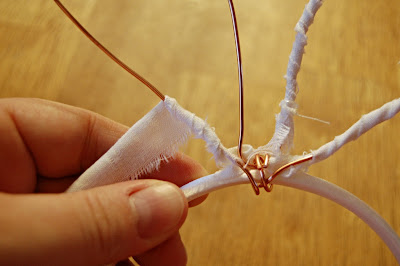
2. wrap the extra wire around the headband, coming back through the middle of the two ears.
wrap each side around the bottom once, ending at the top & snipping off the extra.
(this is so there is nothing on the bottom poking your baby in the head :)
3. tear strips about 1/2" wide down the length of your white fabric.
(i used 4 strips that were approximately 24" long)
4. on the top of your headband, put a small dab of hot glue, towards the backside.
5. take one of your fabric strips & stick the end of it on top of the hot glue.
6. starting with the outside part of one ear, wrap your strip around the wire, ending on the inside part of the ear. put a few small dots of hot glue as you wrap around to ensure that the strip doesn't come unwrapped. make sure you put a dab at the very top where the ear bends as well.
7. repeat above steps for remaining ear.
8. next, put a dab of hot glue on the underside of the headband where the wire sits. put the end of one strip on the bottom & wrap around to the back. make one complete loop around the wire to cover it, then continue out towards one end of the headband, passing through the middle of the ear as you pass by it.
9. continue wrapping around the headband, again adding dabs of hot glue to secure on the underside of the headband. snip off any extra fabric when you get to the end of the headband. repeat last steps to cover the other side of the headband.
& you are finished.
i covered my entire headband because i wanted all the fabric to match.
i left all the fraying pieces because i liked how it looked fuzzy like regular rabbit ears. :)
(if i had a little girl i would put a big bow right there in between the two ears.. )
 |
| (can i get a 'hooray' for the bumbo seat?! man i wish i had this thing with the dude!) |
i dunno... maybe i'm partial..
but they are pretty dang cute..
then again maybe it's just the model :)


These are so adorable! I love this idea!
ReplyDeleteSo cute, and the little guy is adorable! I love it!
ReplyDeleteRachel @ Maybe Matilda
Very cute!
ReplyDeleteNot sure what's cuter- the ears or the little darling who's sportin them ;) Adorable! We would ♥ to see this in our current linky party! Feel free to stop by :) lollyjaneboutique.blogspot.com
ReplyDeleteSO CUTE. oh yeah and the ears are nice too haha. love the baby and the project :)
ReplyDeletePS: I'm doing a giveaway on my blog for $20 to my etsy shop, so if you like pretty jewelry you should come enter!! http://mygirlishwhims.blogspot.com/2011/04/my-spring-fling-giveaway.html
Ahhhh! So stinkin' cute!!!! Your little man looks so adorable in his ears. Creativity just drips from you!
ReplyDeleteThat is just gorgeous ~ I will definately be trying my hand at some of these! Thank you for sharing x
ReplyDeleteThis comment has been removed by the author.
ReplyDeleteThis made me so happy - I love them!!
ReplyDelete